Have you cracked your iPhone X screen? Don’t worry! While a shattered display can be frustrating, you can repair it with the right tools and knowledge. This detailed guide outlines essential steps for replacing your iPhone X screen. You’ll learn how to handle critical elements such as pentalobe screws, manage the front sensor assembly, and detach the earpiece speaker. Whether you consider yourself a DIY enthusiast or simply want to save on repair costs, this comprehensive guide provides a roadmap for successfully replacing your iPhone X screen. However, while this process can be rewarding, it comes with risks, such as voiding your warranty or compromising your device’s water resistance. Therefore, approach this repair with caution. Gather your tools, allocate sufficient time, and let’s embark on the iPhone X screen repair journey!
1. Tools and Materials Needed
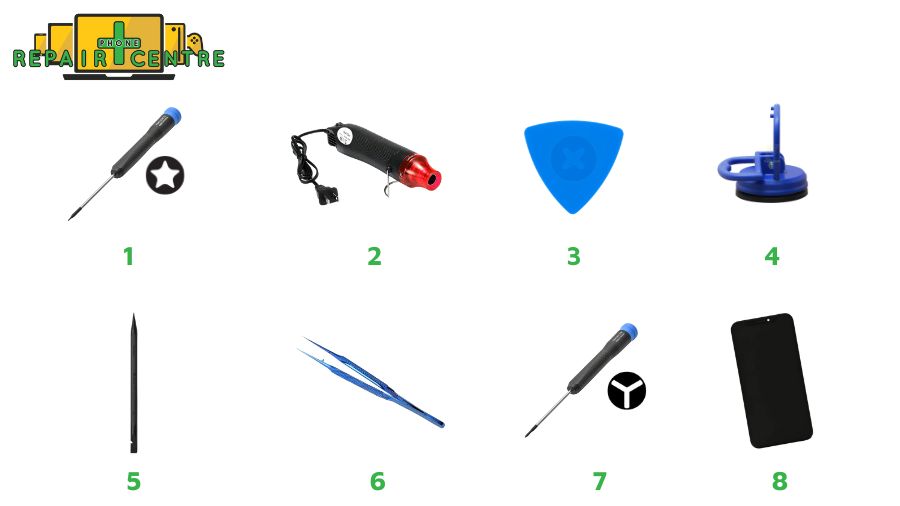
First, you’ll need to gather the necessary tools and materials:
- P2 Pentalobe Screwdriver iPhone
- Heat gun
- Opening Picks
- Suction Handle
- Spudger
- Tweezers
- Tri‑point Y000 Screwdriver
- iPhone X Screen
2. Step-by-Step Guide to Repairing Your iPhone X Screen
If you’re unsure whether your iPhone 11 Pro Max screen needs replacement, watch the video tutorial below for a quick assessment.
After watching the video, continue reading for a detailed guide. The comprehensive guide below will walk you through the entire repair process, divided into clear phases. Each phase contains detailed steps, ensuring you have all the knowledge needed to repair your iPhone X screen, from gathering the necessary tools to completing the final touches. Let’s get started!
Phase 1: Preparation and Initial Opening
These steps focus on gathering materials and gaining access to the internal components of the iPhone X.
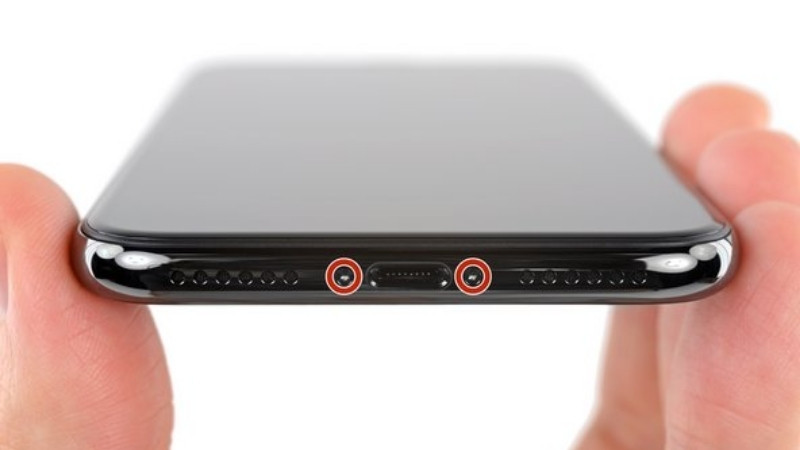
Step 1: Remove Pentalobe Screws
- Discharge your iPhone battery below 25% to prevent fire or explosion.
- Power off your iPhone.
- Remove the two 6.9 mm pentalobe screws at the bottom edge.
- Replace any stripped or damaged screws.
Note: Opening the display compromises waterproof seals. Have replacements ready, or avoid liquid exposure if you don’t replace them.
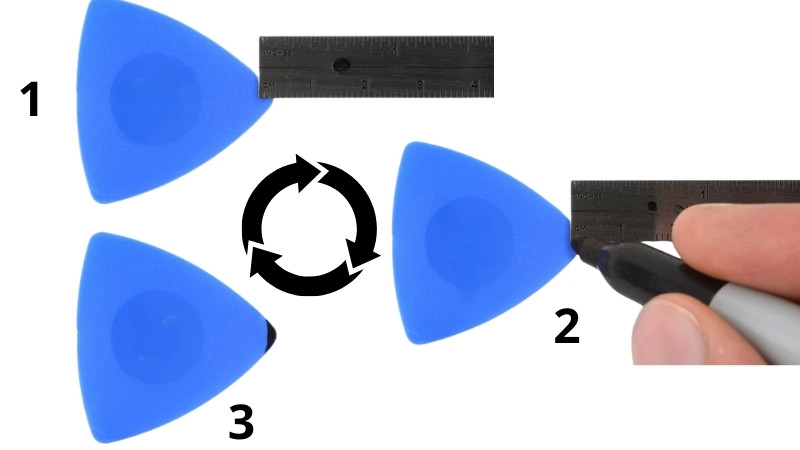
Step 2: Mark Your Opening Picks (for placement while separating)
- To avoid damage, measure 3 mm from the tip of your opening pick (or a coin) and mark it with a permanent marker.
- Mark other corners with different measurements if needed.
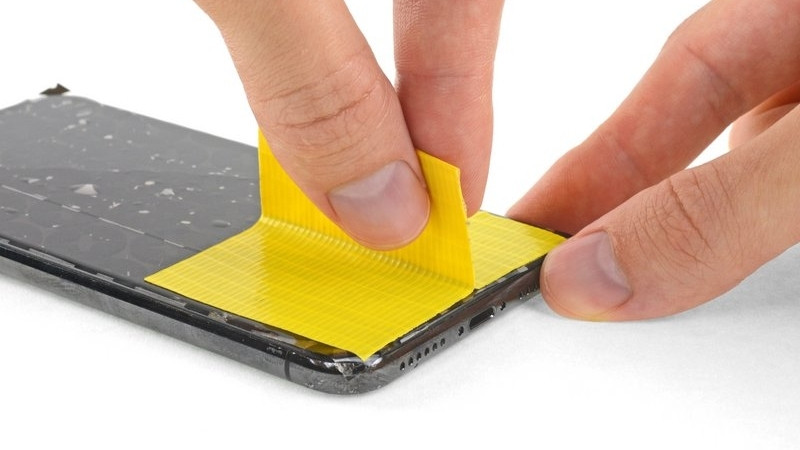
Step 3: Tape Over Cracks (for cracked screens to avoid glass shards)
- Wear safety glasses to protect your eyes.
- Cover the cracked screen with overlapping strips of clear packing tape to contain further breakage and protect yourself.
Phase 2: Screen Separation Process
These steps guide users through carefully separating the screen from the phone body without damaging the adhesive or internal components.
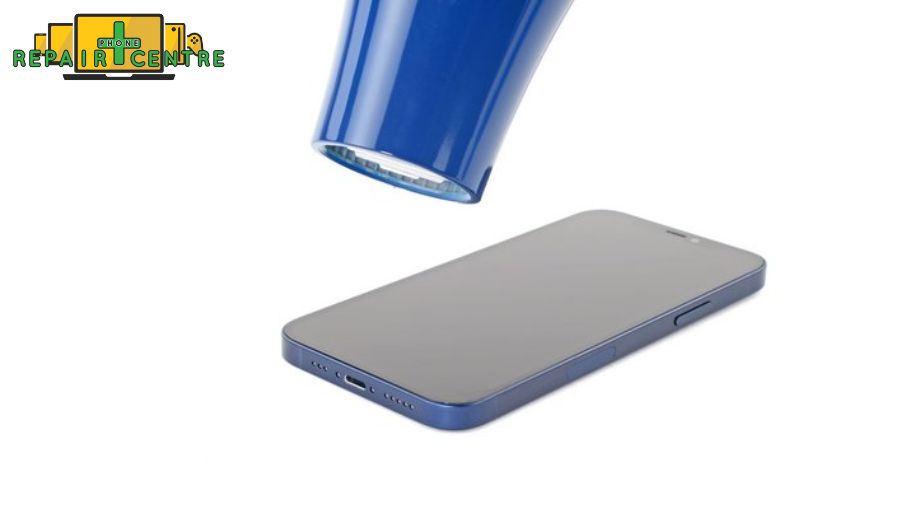
Step 4: Heating and Softening Adhesive (specifically focus on the edges)
- Heat the lower edge of the iPhone with a hair dryer or a heat gun for about a minute to soften the adhesive, facilitating easier opening.
- Avoid overheating to prevent screen damage.
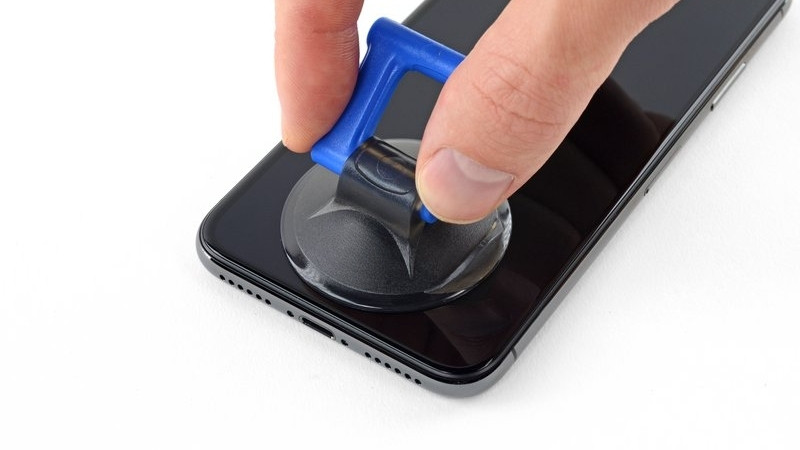
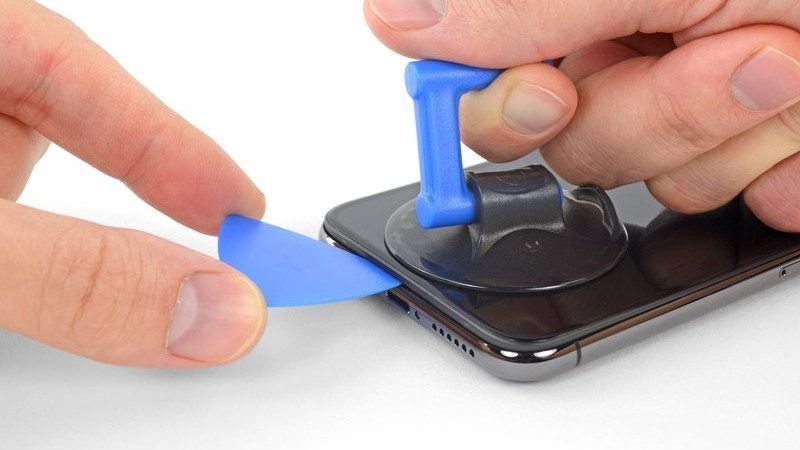
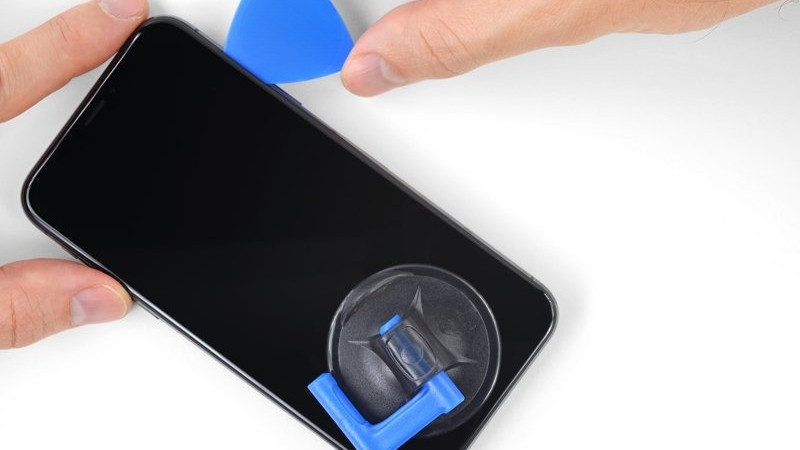
Step 5: Applying Suction Handle (to pull the screen gently)
- Place a single suction handle on the phone’s bottom edge, carefully avoiding the curved glass section.
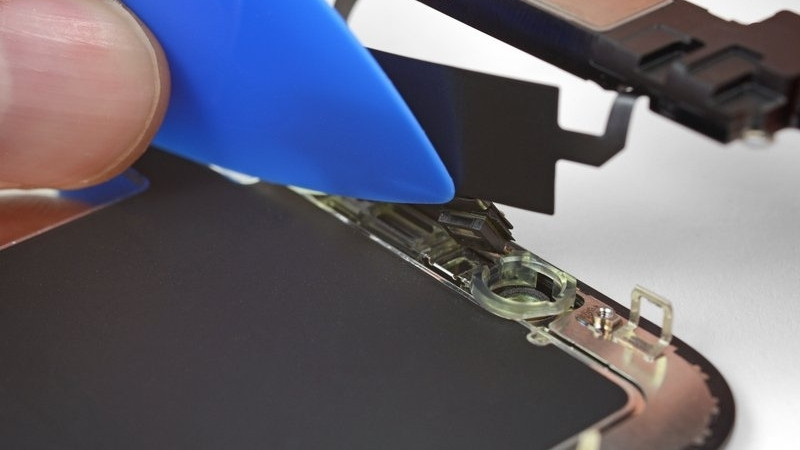
Step 6: Creating a Gap (using the picks to create space between the screen and frame)
- Apply firm, steady pressure on the suction cup to create a small gap between the screen and the frame.
- Insert an opening pick into the gap under the plastic bezel, not the screen itself.
Note: A strong adhesive requires significant force; to weaken it, apply more heat and gently rock the screen.
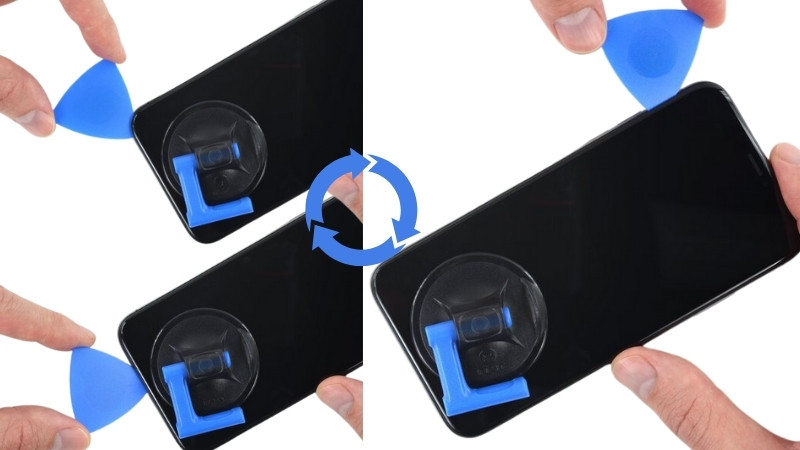
Step 7: Slicing Adhesive (carefully cutting through adhesive around the edges)
- Slide the opening pick around the lower left corner and up the left edge of the iPhone to cut through the adhesive holding the display.
- Avoid inserting the pick more than 3 mm to prevent damaging internal components.
Phase 3: Complete Screen Detachment
You ensure the screen is fully detached without pulling on any sensitive connectors.
Step 8: Screen Information (noting the screen specifications)
- Be cautious of delicate cables along the right edge of your iPhone; avoid inserting the pick here to prevent cable damage.
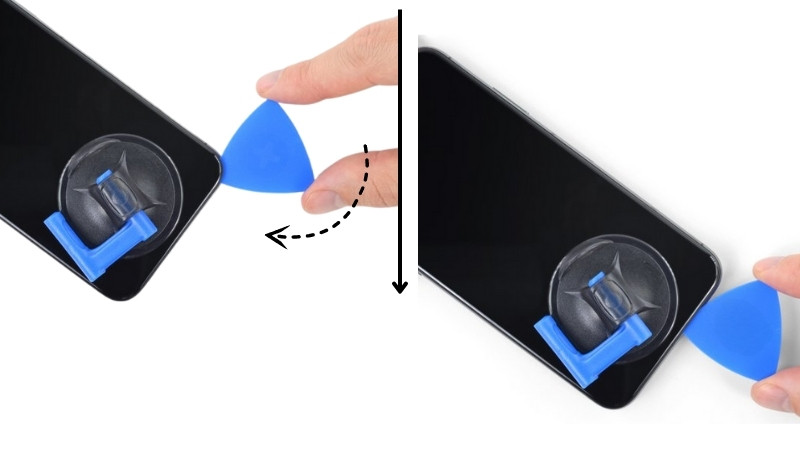
Step 9: Continuing Separation (moving picks along the edges)
- Re-insert the pick at the bottom edge and slide it up the right side to loosen the adhesive further. Avoid inserting more than 3 mm to protect display cables.
Step 10: Handling Top Edge (being extra careful near the sensor area)
- The top edge of the display is secured with adhesive and clips. Slide the pick around the top corner while gently pulling or wiggling the display toward the Lightning port.
Note: Avoid excessive force to prevent clip breakage, and do not insert the pick more than 3 mm into the front panel sensor array to prevent damage. Ensure that you cut any remaining adhesive that secures the display.
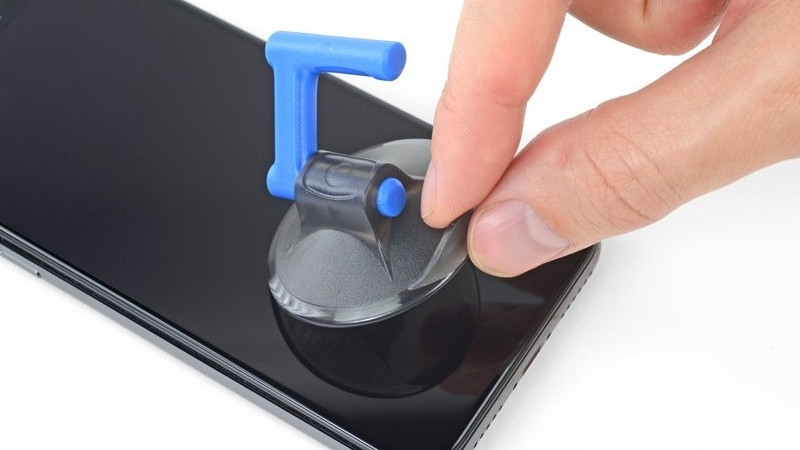
Step 11: Removing Suction Cup (after the screen is loosened)
- Pull the small nub on the suction cup to release it from the front panel.
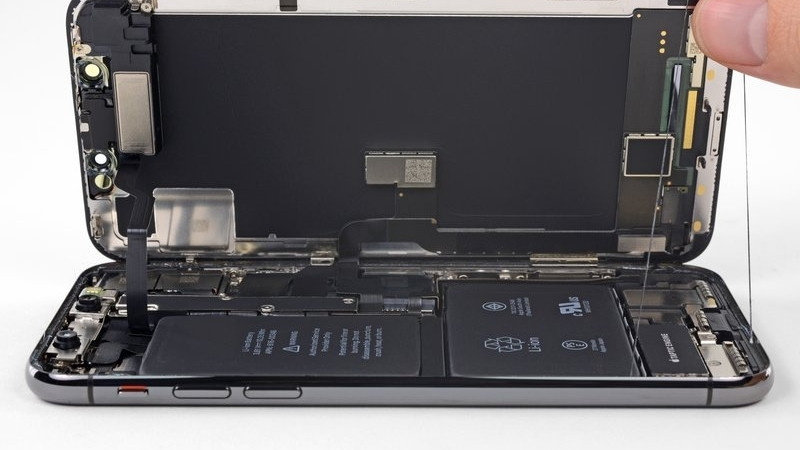
Step 12: Opening the iPhone (gently lifting the screen, watching for cables)
- Swing the display up from the left side like opening a book’s back cover. Avoid fully separating the display, as fragile ribbon cables are still attached to the iPhone’s logic board. Ensure the frame comes off with the display to avoid getting stuck. Prop the display against something stable for support during work.
- For reassembly, align the clips along the top edge, gently press the top edge into place, and ensure all clips are secure before snapping down the rest of the display.
Phase 4: Disconnecting Internal Components
These steps focus on disconnecting key cables and components attached to the screen, battery, and logic board.
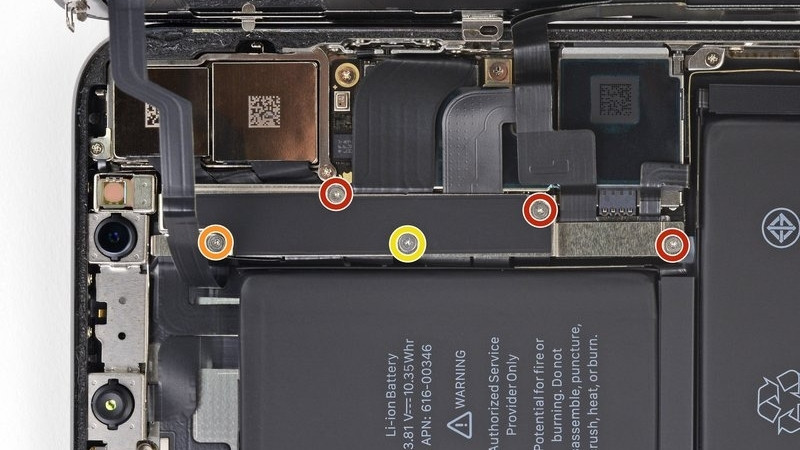
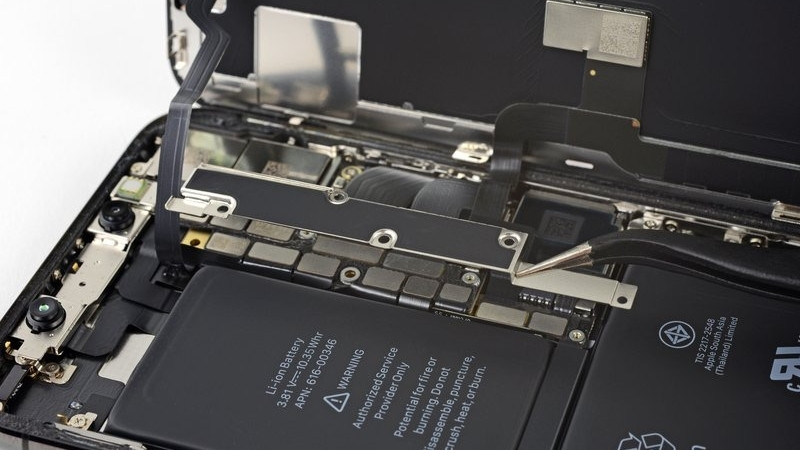
Step 13: Remove Five Y000 Screws from the Logic Board Connector Bracket
- Three 1.1 mm screws
- One 3.1 mm screw
- One 3.7 mm screw
Note: Keep track of each screw to ensure proper reassembly and prevent damage to your iPhone.
Step 14: Removing the Bracket (covering the connectors)
- Gently lift the bracket, which may be lightly adhered.
- Test all functions after powering on your iPhone during reassembly before sealing the display.
- Power down the iPhone completely before continuing.
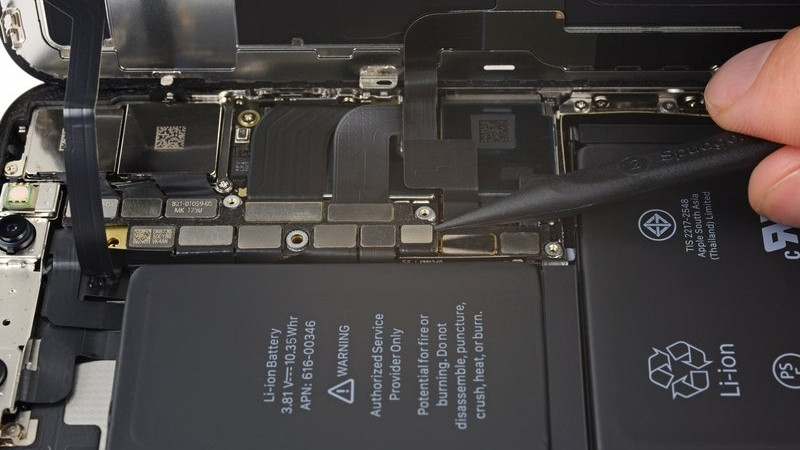
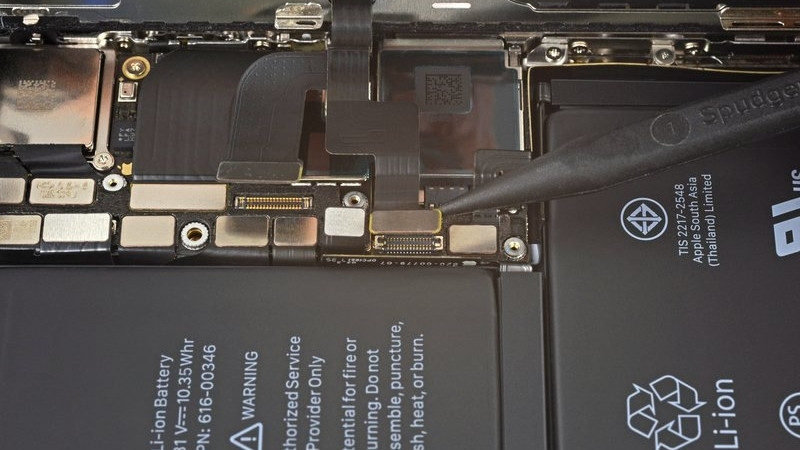
Step 15: Disconnecting Battery Connector (to prevent short circuits)
- Use a spudger or clean fingernail to lift the battery connector from its socket on the logic board.
- Avoid damaging the black silicone seal around connections, which provides water and dust protection.
- Bend the connector from the logic board to prevent accidental power contact during repair.
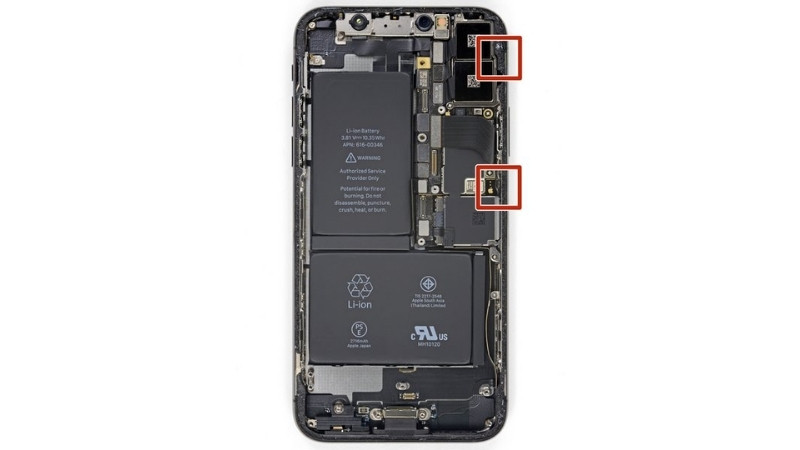
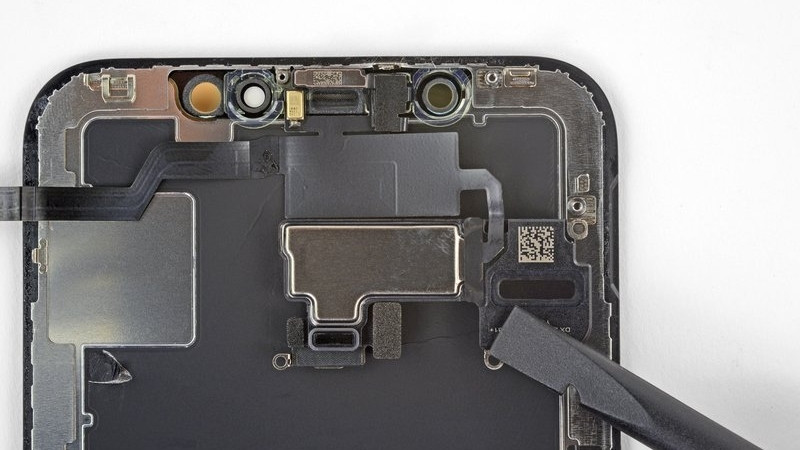
Step 16: Disconnecting Front Panel Sensor Assembly (handling delicate connectors)
- Use a spudger or fingernail to disconnect the front panel sensor assembly connector.
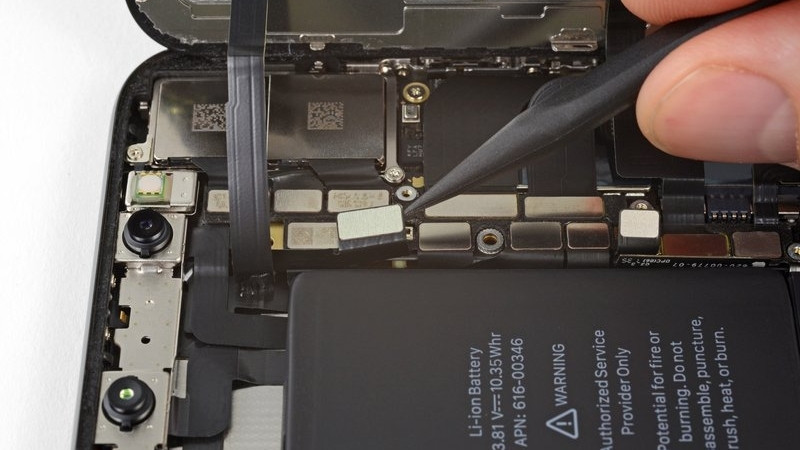
Step 17: Disconnecting OLED Panel Cable
- Use a spudger or fingernail to disconnect the OLED panel cable connector.
- When reattaching press connectors, align and press down on each side until it clicks into place to avoid damaging the pins.
Note: Do not press down in the middle.
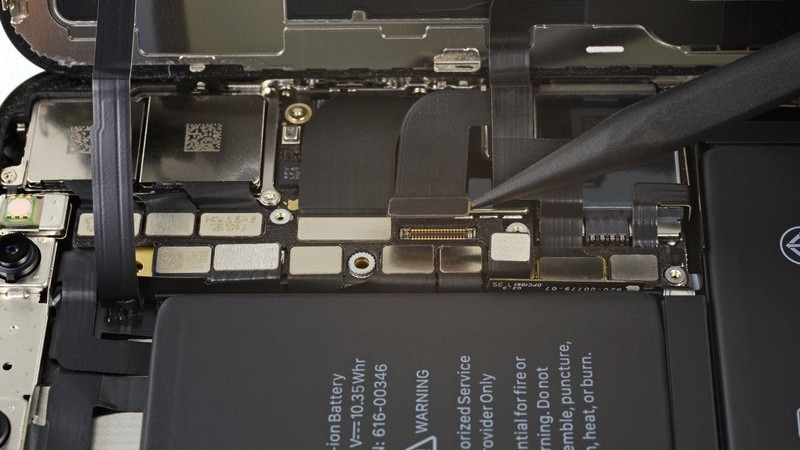
Step 18: Disconnecting Digitizer Cable
- Use a spudger to lift the digitizer cable connector from its socket. Due to its recessed location, take care when reconnecting.
- Align carefully and press both sides gently until it clicks into place. If the screen doesn’t respond to touch after repair, disconnect the battery and ensure the connector is fully seated and dust-free.
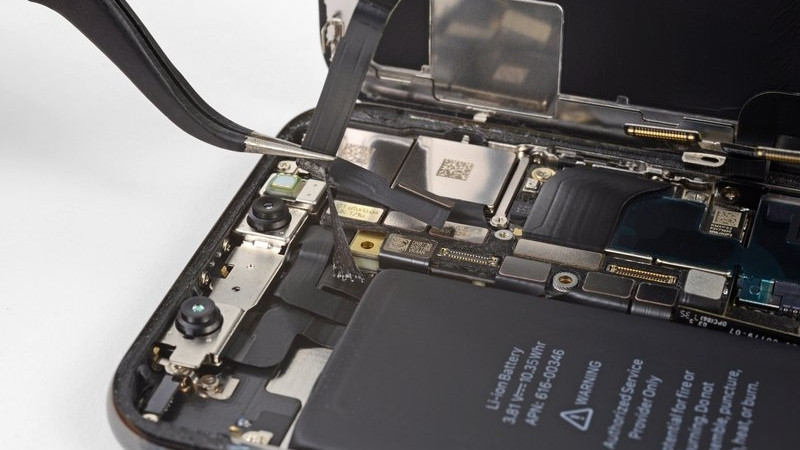
Step 19: Lifting Front Panel Sensor Assembly
- Carefully lift the front panel sensor assembly flex cable, separating it from the adhesive.
Phase 5: Display Assembly Removal
Once all connections are properly disconnected, these steps focus on removing the display assembly for screen replacement.
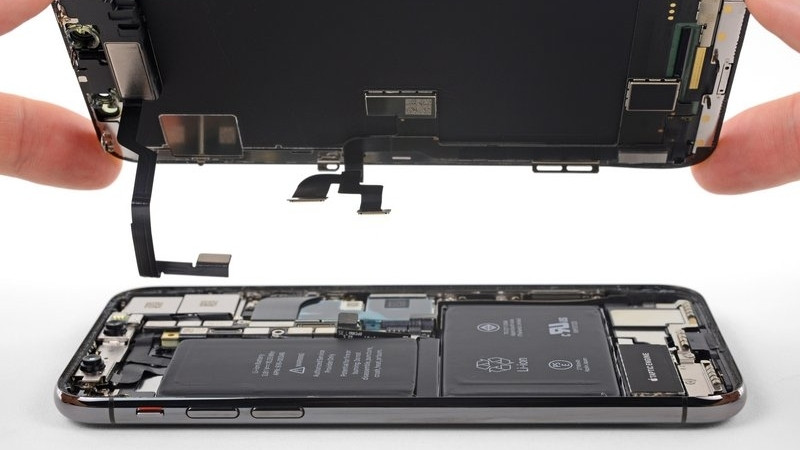
Step 20: Removing Display Assembly (completely detaching the screen)
- Remove the display assembly. Consider replacing the waterproof adhesive around the display edges during reassembly.
Phase 6: Earpiece Speaker and Sensor Assembly Removal
These steps involve transferring essential components from the old screen to the new one.
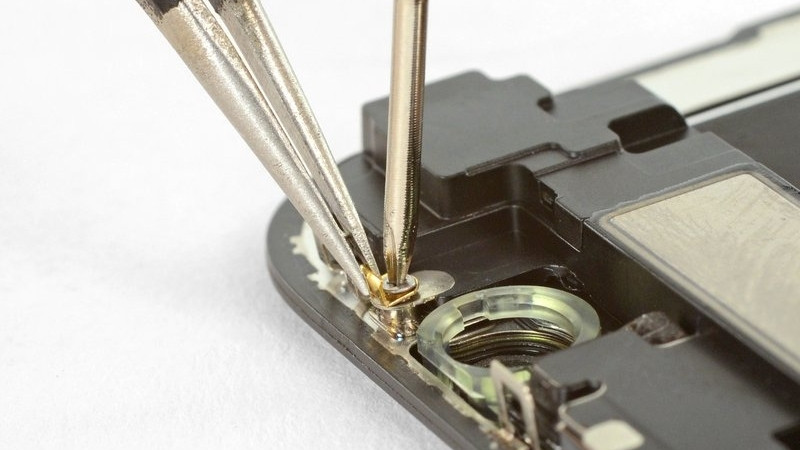
Step 21: Removing Earpiece Speaker and Front Sensor Assembly (carefully detaching the assembly)
- Remove the 1.2 mm Y000 screw near the infrared camera port on the back of the display assembly.
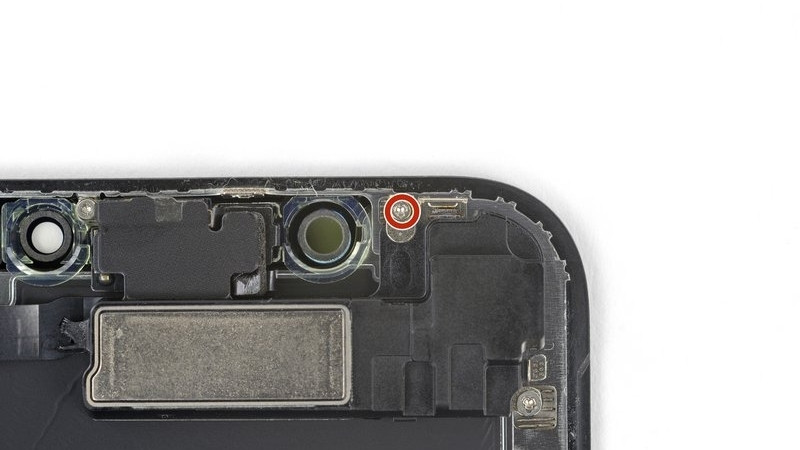
Step 22: Handling Metal Grounding Clip (not to lose or damage it)
- Remove the small metal grounding clip beneath the screw if it doesn’t come out with the screw. Orient it correctly during reassembly and hold it in place while tightening the screw.
Step 23: Removing Speaker/Sensor Assembly Screws (keeping screws organized)
- Remove two more Y000 screws securing the speaker/sensor assembly: one 1.6 mm and one 1.3 mm.

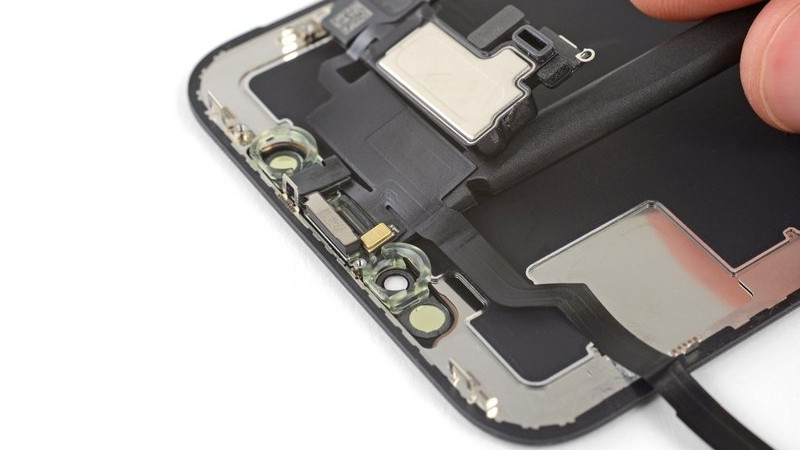
Step 24: Removing the Earpiece Speaker
- Gently pry under the top edge of the earpiece speaker assembly with a spudger. Carefully flip it down and away from the display, mindful of the thin flex cable.
Step 25: Softening Adhesive (for components that are glued to the screen)
- Use a hairdryer, heat gun, or iOpener to soften the adhesive at the top front of the display for about a minute.
Phase 7: Transferring the Remaining Components
This group focuses on moving delicate parts like the microphone and sensors to the new screen.
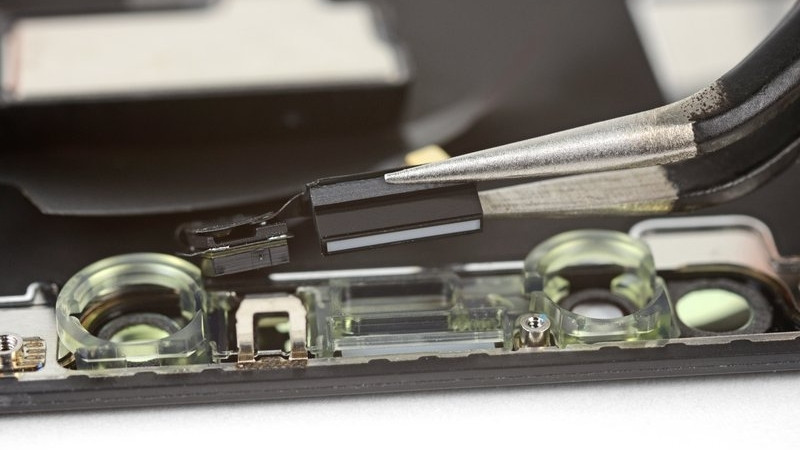
Step 26: Separating Microphone and Flex Cable (without damaging the flex cable)
- Carefully slide a spudger underneath the flex cable below the microphone. Twist gently to separate it without straining or damaging the cable.
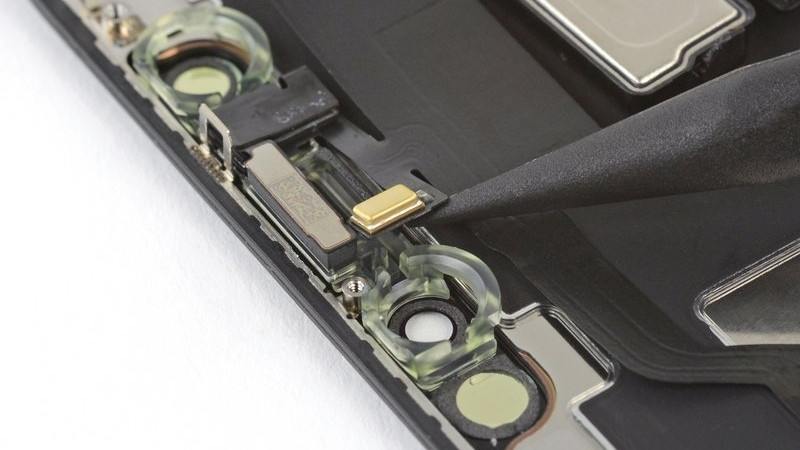
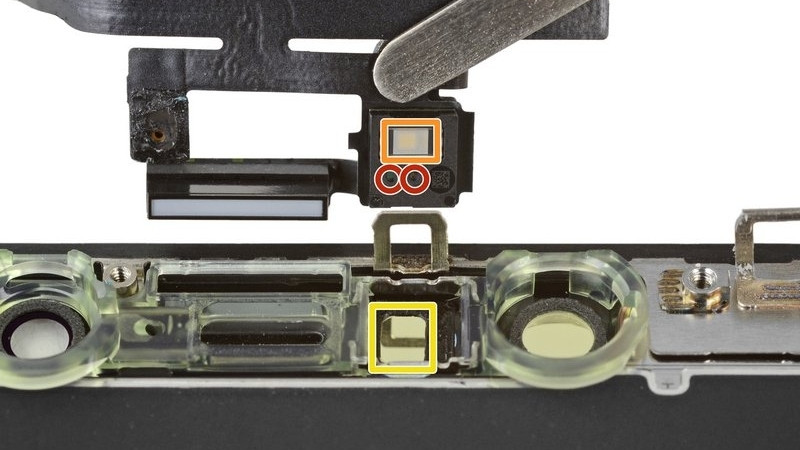
Step 27: Removing Proximity Sensor Module (taking care of alignment for reassembly)
- Slide an opening pick beneath the flex cable and underneath the proximity sensor + flood illuminator module.
- Gently lift and wiggle to separate it from its notch in the front panel. Lift the speaker carefully for better access, avoiding strain on the flex cable.
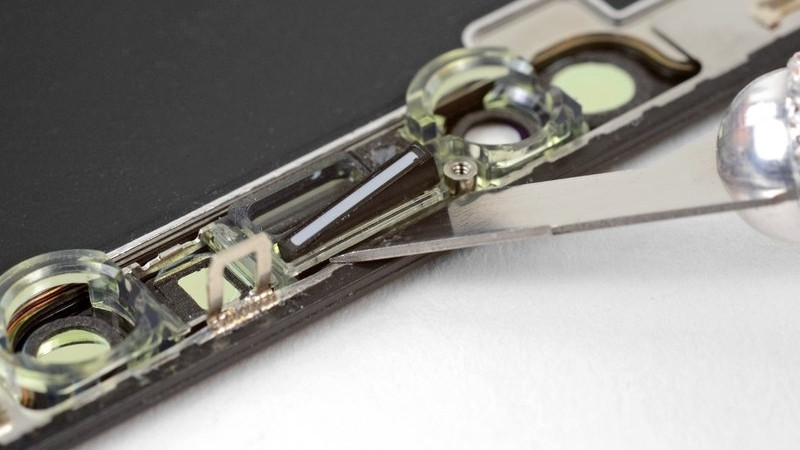
Step 28: Removing Ambient Light Sensor
- Use tweezers to gently wiggle and lift the ambient light sensor from its notch in the display. Don’t damage the thin flex cable attaching it to the sensor assembly.
Step 29: Handling Ambient Light Sensor and Diffuser (noting their placement)
- If you removed the entire ambient light sensor, proceed to the next step. If the white diffuser strip remains embedded in the display, carefully lever it out along the top edge using a thin blade or pry tool after applying heat.
- During reassembly, ensure the diffuser is correctly oriented before setting the ambient light sensor on top.
Phase 8: Final Disassembly and Reassembly
This final set of steps involves putting everything back together with the new screen.
Step 30: Removing Earpiece Speaker and Front Sensor Assembly (complete transfer of components)
- Remove the earpiece speaker and front sensor assembly. During reassembly, ensure the proximity sensor and flood illuminator are positioned without obstruction from the adhesive.
3. FAQs
Is it worth it to repair the iPhone X screen yourself?
Here are key considerations to help you decide if repairing is worthwhile:
- Cost: Doing it yourself is usually cheaper than going to a professional repair service, especially if you’re comfortable sourcing quality replacement parts. However, the savings might not be significant if you purchase tools and components.
- Technical Skills: iPhone X screen repair is complex, requiring specialized tools and a careful approach. If you’re confident in your technical ability and have experience with electronics, it can be a rewarding DIY project. If not, you risk damaging other components, which could lead to more expensive repairs.
- Time: DIY repair can take time to research, order parts, and complete the repair. Professional services may be faster and more convenient if you’re looking for a quick fix.
- Warranty Considerations: Repairing the screen yourself will void any warranty or AppleCare coverage. If your phone is still under warranty, you may want to explore official repair options first.
- Quality of Repair: Professional repair services typically offer warranties on their work, while DIY repairs may not have the same guarantee. A professional might be a safer bet if precision and quality are priorities.
Evaluate five factors to determine whether repairing your cracked iPhone screen is your best course of action. 
How long does it typically take to replace an iPhone X screen?
The time it takes to replace an iPhone X screen varies significantly between DIY and professional repair services.
A DIY screen replacement typically takes between 1.5 to 3 hours. This is due to the multiple steps involved, including carefully removing the damaged screen, disconnecting sensitive components like the Face ID sensors, and installing the new screen. If you’re unfamiliar with the process, the repair might take longer, especially if you need to watch tutorials or face challenges with the small, delicate parts.
In contrast, a professional repair service can complete the job much faster, typically within 30 minutes to 2 hours for on-site repair shops. Professional technicians have specialized tools and experience, enabling them to work more efficiently. Many repair shops even offer same-day service, completing the screen replacement in under an hour when done in-store.
If you’re facing a damaged iPhone X screen and are unsure whether to attempt a DIY repair or seek professional help, we are here to make your decision easier. We offer fast, reliable, and professional iPhone X screen repair services at Phone Repair Center, often completing repairs within 1 hour at our shop. Click this link to learn more about our services or schedule an appointment.
What are the potential complications when replacing the iPhone X screen?
Replacing the iPhone X screen may seem simple, but it can lead to several complications, especially if you choose the DIY route. Here are some of the common issues to watch out for when replacing the iPhone X screen:
- Damage to Face ID Sensors: The iPhone X has delicate Face ID sensors integrated into the screen. During the replacement process, these sensors can be easily damaged or misaligned, causing Face ID to stop working. Fixing this often requires professional expertise to recalibrate or repair.
- Loss of Display Quality: Low-quality replacement parts or improper installation can diminish display performance. The new screen may lack the original brightness, color accuracy, or touch sensitivity, which can negatively affect your overall experience with the phone.
- Touchscreen Malfunction: Incorrectly installing the screen can cause issues like ghost touches, where the screen reacts without being touched, or a completely unresponsive touchscreen. This often happens when flex cables are damaged or not properly connected.
- Loss of Water Resistance: The iPhone X is designed to be water-resistant, but after screen replacement, this feature may be lost if the device isn’t sealed properly. Exposure to moisture or liquids increases the risk of water damage.
- Battery Damage: Replacing the iPhone X screen can inadvertently damage the battery, especially if care isn’t taken. A damaged battery can lead to overheating, swelling, or even safety risks.
- Internal Component Damage: The iPhone X’s internal components, such as the camera, speakers, or antennas, are packed tightly together. These parts can be easily damaged during disassembly or reassembly, leading to additional repair costs.
- Voiding the Warranty: A DIY screen replacement or visiting an unauthorized repair shop can void any remaining warranty or AppleCare coverage, making future repairs more difficult and expensive.
Can I reuse the original adhesive when reinstalling the new screen?
Reusing the original adhesive is generally not recommended when replacing the iPhone X screen. The adhesive used in the iPhone X is specifically designed to provide a tight seal that ensures water and dust resistance. For the best results, it is highly recommended to use new adhesive strips specifically designed for your iPhone model when reinstalling the screen. This will ensure a secure fit, restore water and dust resistance, and improve the overall longevity of the repair.
Do I need to remove the battery to replace the screen?
Yes, it’s highly recommended that the battery be disconnected when replacing the iPhone X screen. Although you don’t need to remove the battery, disconnecting it completely is crucial for several reasons:
- Safety: Disconnecting the battery helps prevent accidental short circuits or electrical damage during screen replacement. This reduces the risk of damaging the internal components or causing a fire hazard.
- Preventing Power Issues: The iPhone X has sensitive electronics, and replacing the screen while the phone is powered on can cause issues such as ghost touches or permanently damage the touchscreen components.
- Component Protection: Disconnecting the battery ensures that no power flows to the display or other parts of the phone. This minimizes the risk of damaging delicate components like the Face ID sensors, display connectors, or flex cables during the repair.